Your Complete Guide to Nail Art Gels — Chrome, Stamping, Foils, Glitter & More
Scroll down to the FAQ section below for the Step-by-Step Nail Art Guides for the 9 topics mentioned above.
▶ Planet Gel Paints — Click for info & images
Planet Gel Paints are highly pigmented potted gels with the perfect consistency for detail work, designed to draw extremely thin lines for more intricate designs. The opaque one coat coverage means you save time and product whilst creating detailed nail art.
%20(8).png)
When opting to use Planet Gel Paints for full cover designs or as a french application we would recommend to apply sticky bond to the free edge and sides of the free edge for best results. We always recommend to use these gels with our PN Speciality Dual Cure Lamp (405nm LED, 365nm UV 54 watts), if your lamps' LED wavelength differs the product won't cure properly and you may need to follow the UV cure time. These gels work best when applied in thin even coats. These gels cure with a tacky layer making them perfect to be used with our neon pigments. Pro Tip: when using these gels for character painting and you are finding the viscosity tricky to get an even application, try mixing it with a little bit of Planet Gel Polish Base Coat.
▶ Stamping Gel — Click for info & images
Stamping Gel is a HEMA FREE highly pigmented gel with the perfect consistency for use with stamping plates, designed to give you perfect transfers every time. Unlike normal stamping polish, this product will only dry once cured so there's no pressure when it comes to time.
%20(4).png)
Don't forget to get some Liquid Latex Cuticle Guard to protect your client's skin and for super easy clean up after stamping. No Nail products should ever be applied to the skin! Scroll down to the FAQ for the Step by Step Guide.
▶ Ella Zala Gel Liners — Click for info & images
Ella Zala Gel Liners are HEMA FREE ultra-pigmented full coverage gel paints with a thin liner brush designed for precise and steady control. A smooth formula with self-levelling properties are here to inspire you and help you unleash your inner artist!
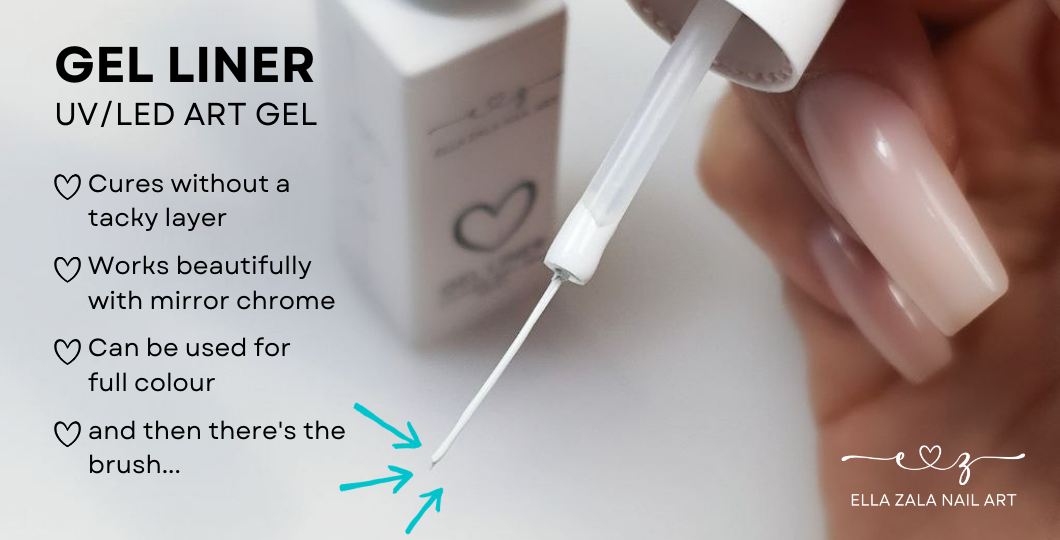
These are Dual Cure Gels recommended to be cured for 60-90sec 405nm LED or 2-3mins 365nm UV. We recommend to apply these highly pigmented gels in a thin even coat to ensure a proper cure. These gels cure without a tacky layer making them perfect to be used with Chrome or Aurora pigments, achieve best results by applying the chrome or aurora as soon as the nail comes out of the lamp. Scroll down to the FAQ for the Step by Step Guide where we used these liners for an Isolated Chrome effect.
▶ Ella Zala Art Gel Polishes — Click for info & images
Ella Zala Art Gel Polishes are HEMA FREE ultra-pigmented, single coat gel polishes designed to make the nail tech's life easier.
%20(10).png)
This formula comes in a 15ml polish bottle with a polish brush making a smooth thin coat application a breeze. Four convenient most frequently used colours make up the range. These gels are full cover one coat colours that cure without a tacky layer making them ideal to be used with mirror chrome or aurora pigments. These are Dual Cure Gels recommended to be cured for 60-90sec 405nm LED or 2-3mins 365nm UV. We recommend to apply these highly pigmented gels in a thin even coat to ensure a proper cure.
▶ Ella Zala Magnetic Gel — Click for info & images
Ella Zala Magnetic Gel polishes will give any set of nails a stunning, eye-catching effect! These gels provide a Magnetic Cat Eye effect, they are highly pigmented and provide a strong magnetic attraction for easy design manipulation.
-30.png)
The Magnetic Over Black range are colours that work best when applied over black as the gel itself has a black undertone. The Magnetic Over the Rainbow range can be applied over most colours but you get the best results when applied over a complimentary colour.
Simply apply any of these gels over the base colour of choice, don't cure, use your chosen magnet to create the 'cat eye' design of choice and once you are happy with the effect simply cure — 60sec 405nm LED or 2mins 365nm UV. These gels cure with a tacky layer. These gels can be used for full coverage without magnetic manipulation too, providing more of a shimmer gel polish look.
▶ Ella Zala Foil Gel — Click for info & images
Ella Zala Foil Gel has revolutionised foil transfers!
%20(5)(1).png)
Need a little assistance in the nail art department? We got you! Our Ella Zala Foil Gel & Transfer Foils will bring out the nail artist in you. No need for air drying like with foil glue! Paint. Cure. Transfer. It's that simple! Scroll down to the FAQ for the Step by Step Guide.
▶ Ella Zala Art Effect Top Coats — Click for info & images
Ella Zala Art Effect Top Coats are top coats with common art effects mixed in, saving you the added step of having to create these effects using other methods.
%20(7).png)
These are dual cure top coats that cure without a tacky layer. Recommended cure times are 60sec 405nm LED or 2mins 365nm UV. Even though these top coats cure without a tacky layer and most techs would refer to these top coats as no-wipe, we would still recommend wiping after curing using a nail wipe saturated with The One spray. Recent studies have shown that there is still a small amount of uncured gel left after curing and this is why removing it by wiping is highly recommended. Simply wait for the nails to cool slightly before wiping over.
▶ Planet Spider Gel — Click for info & images
Planet Spider Gel is a highly pigmented gel with a super stringy consistency, designed to give you perfect lines every time. Used to create super thin lines, straight lines, geometric patterns, spider web, background detail effects and 3D line patterns.
%20(6).png)
Don't forget to get some Liquid Latex Cuticle Guard to protect your client's skin and for super easy clean up after curing. No Nail products should ever be applied to the skin!
▶ Lastik Stick and Stay Gel — Click for info & images
Lastik Stick and Stay Gel is truly the most versatile single product in the Planet Nails product range. See the list of nail art effects that you can use your Clear Lastik for:
%20(9).png)
Scroll down to the FAQ for a few Step by Step Guides where Lastik is recommended to be used.
FAQ
.png)
.png)
.png)
.png)
Mirror Chrome — Step by Step
- Start with a base colour that complements your chrome — apply 1-2 cured coats.
- Apply a thin even coat of Luxe Gloss and cure for 60 seconds (405nm LED) or 2 minutes (365nm UV). Quick tip: when doing chrome on thumbs, cure them separate and flat for a good transfer.
- Pick up the chrome with a burnishing brush or applicator and place on the nail.
- Cover the whole nail with chrome before rubbing in.
- Use your burnishing brush, applicator or gloved finger to polish the chrome to a mirror finish. Quick tip: dust well with a soft brush to remove any loose excess chrome — any left on the nail will give a glittery appearance.
- Apply Sticky Bond to the free edge and sides to prevent peeling. OR apply a thin coat of Base Coat or Lastik and cure to encapsulate your chrome.
- Seal with your favourite PN top coat and cure for 60 seconds (405nm LED) or 2 minutes (365nm UV).
Aurora Chrome — Step by Step
- Start with a base colour that complements your aurora — apply 1-2 cured coats.
- Apply a thin even coat of Luxe Gloss and cure for 60 seconds (405nm LED) or 2 minutes (365nm UV). Quick tip: when doing chrome on thumbs, cure them separate and flat for a good transfer.
- Pick up the chrome with a burnishing brush or applicator and place on the nail.
- Cover the whole nail with chrome before rubbing in.
- Use your burnishing brush, applicator or gloved finger to polish the chrome to an aurora finish. Quick tip: covering the nail with pigment before rubbing it in will help prevent a patchy or grainy look in your aurora finish.
- Dust well with a soft brush to remove all excess powder — any loose powder left on the nail will give a glittery look.
- Apply Sticky Bond to the free edge and sides to prevent peeling.
- Seal with your favourite PN top coat and cure for 60 seconds (405nm LED) or 2 minutes (365nm UV).
.png)
.png)
.png)
.png)
.png)
.png)
.png)
Glitter Sugaring — Step by Step
- Apply a thin coat of SR Top Coat to the nail — don't cure. Quick tip: a stain resistant top coat helps prevent staining, especially when using light coloured glitters.
- Pour your chosen fine glitter over the nail, covering it completely.
- Gently tap off any excess over your catch tray. Quick tip: a scoop, catch and pour works well, or even a large dappen dish.
- Cure for 60 seconds (405nm LED) or 2 minutes (365nm UV).
- Dust well with a stiff bristle brush to remove any loose glitter.
- You're done! Quick tip: don't apply top coat over the finished result as it will remove the 3D sugared effect. This technique can be done with any fine glitter, over the whole nail or just as a line design.
.png)
.png)
Gem Design — Step by Step
- Pop a small amount of top coat and Lastik Gel onto a nail art palette. Quick tip: mixing your beads into top coat makes them easier to pick up and place.
- Use a silicone applicator to mix some caviar beads of various sizes into the top coat.
- Pick up a small bead of Lastik and place it in a long oval shape down the middle of the nail — don't cure.
- Using a pick up pen, place your gems onto the Lastik.
- Cure for 60 seconds (405nm LED) or 2 minutes (365nm UV) when you are happy with placement. Quick tip: while the Lastik is still wet you can move and adjust gem placement using fine point tweezers.
- Pick up the caviar beads with your applicator or a fine line brush and place them around the gems.
- Once happy with the placement, cure for 60 seconds (405nm LED) or 2 minutes (365nm UV).
- Apply top coat around the gems and cure for 60 seconds (405nm LED) or 2 minutes (365nm UV). Quick tip: don't apply top coat over your gems/crystals as it will dull the facets. Apply around the gems only — a liner brush works well for this.
.png)
.png)
.png)
Glitter Burnishing — Step by Step
- Apply a thin coat of Rubber Base and cure for 60 seconds (405nm LED) or 2 minutes (365nm UV). Quick tip: you can use any gel that cures with a tacky layer, like a complementary gel polish colour or a base coat gel.
- Pour your chosen fine glitter over the nail, covering it completely. Note: big glitter pieces won't stick to the tacky layer.
- Use your burnishing brush to rub the glitter in, similar to chrome. Quick tip: a scoop, catch and pour works well for excess glitter, or a large dappen dish.
- Gently dust to remove any loose glitter.
- Seal with your chosen top coat.
- Cure for 60 seconds (405nm LED) or 2 minutes (365nm UV). Quick tip: the finer the glitter the better the coverage, giving a similar effect to chrome without the bulk of encapsulation.
.png)
.png)
.png)
.png)
.png)
Chameleon Flake — Step by Step
- Start with a base colour that complements your flake — apply 1-2 cured coats.
- Apply a thin even coat of Luxe Gloss and cure for 60 seconds (405nm LED) or 2 minutes (365nm UV). Quick tip: when doing flakes on thumbs, cure them separate and flat for a good transfer.
- Pick up the flakes with a burnishing brush or applicator and place on the nail.
- Use your burnishing brush, applicator or gloved finger to polish the flakes to a mirror finish.
- Dust with a soft dusting brush. Quick tip: dust well to remove all excess flakes — any loose flakes left on the nail will contaminate your top coat.
- Apply Sticky Bond to the free edge and sides to prevent peeling.
- OR apply a thin coat of Base Coat or Lastik and cure to encapsulate your flakes.
- Seal with your favourite PN top coat and cure for 60 seconds (405nm LED) or 2 minutes (365nm UV).
Note: Chameleon flakes will look different over different base colours, and also look different when a matte coat is applied.
.png)
.png)
.png)
.png)
.png)
Isolated Chrome / Chrome Accents — Step by Step
- Apply your base colour of choice — 1-2 cured coats.
- Apply a thin even coat of SR Top Coat and cure for 60 seconds (405nm LED) or 2 minutes (365nm UV). Quick tip: this top coat layer helps prevent buffing into your colour and prevents a patchy look. SR Top Coat keeps layers nice and thin.
- Buff the entire nail with a soft buffer.
- Dust and wipe using a nail wipe saturated with The One.
- The chrome/aurora won't stick to a buffed surface. Quick tip: buff, dust, then wipe with IPA — this prevents the glittery look and gives you a clean background.
- Create your design using gels that cure without a tacky layer, like Ella Zala Gel Liners, and cure.
- Burnish your chrome or aurora into the cured gel and dust. This can be done with any design or chrome.
- Quick tip: dust well with a soft dust brush — any loose chrome or aurora left on the nail will mix with your top coat giving a glittery look.
- Apply Sticky Bond to the free edge and sides to prevent peeling at the free edge.
- OR apply a thin coat of Base Coat or Lastik and cure to encapsulate your design.
- Seal with your favourite PN top coat and cure for 60 seconds (405nm LED) or 2 minutes (365nm UV).
.png)
.png)
.png)
.png)
.png)
.png)
Foil Transfer — Step by Step
- Start with a base colour that complements your transfer — 1-2 cured coats.
- Apply a thin even coat of Ella Zala Foil Gel and cure for 60 seconds (405nm LED) or 2 minutes (365nm UV). Quick tip: when doing transfers on thumbs, cure them separate and flat for a good transfer.
- Meanwhile, cut a small piece of your chosen transfer from the sheet.
- Apply a small amount of The One Spray (IPA) to a nail wipe and wipe the back of the transfer to remove any dust or debris. Wait for it to dry. Quick tip: never use any solvents containing acetone to clean the back of your foils as it will dissolve your design.
- Carefully place your transfer over the cured foil gel — pretty side up!
- Rub, rub, rub! Make sure you get into the corners, rubbing until you get a full transfer. Quick tip: you can use your finger, a nail wipe or a silicone tool to help with the transfer.
- You will notice the backing lifting away — this indicates a good transfer.
- Once you are happy with the transfer, remove the backing paper.
- If you have any blank spots, place the foil over the nail again and rub to patch fill.
- Apply Sticky Bond to the free edge and sides to prevent peeling.
- OR apply a thin coat of Base Coat or Lastik and cure to encapsulate your transfer.
- Seal with your favourite PN top coat and cure for 60 seconds (405nm LED) or 2 minutes (365nm UV).
.png)
.png)
.png)
.png)
.png)
Stamping Gel — Step by Step
- Apply liquid latex to your client's skin to prevent exposure to gel. Caution: nail products should never be applied to the skin, including art products like stamping gel.
- Apply two thin even coats of stamping gel, allowing to dry clear.
- Apply base colour of choice — 1-2 coats cured.
- Place a small amount of stamping gel in a line on one side of your chosen design.
- Use your scraper to spread the gel evenly over the design, scraping a few times. Quick tip: scrape in a few directions to ensure no streaks before picking up the design. A little gel goes a long way.
- Press the jelly stamper onto the plate to pick up the transfer.
- Try to pick up the design smoothly in one motion to prevent smudging.
- Align the stamper to the nail before carefully stamping it onto the nail.
- Cure for 60 seconds (405nm LED) or 2 minutes (365nm UV).
- Seal with your favourite PN top coat and cure for 60 seconds (405nm LED) or 2 minutes (365nm UV).
.png)
.png)
.png)
Clear Lastik or Stick 'n Float Rubber base (for your standard flat back gems/crystals)- recommended cure times for both are 60sec (405nmLED) or 2mins (365nmUV).
For larger gems like bows or non-flat backs you may find Iconic to work better- recommended cure time 60sec (405nmLED) or 2mins (365nmUV).
PUG Builder Clear is our thickest viscosity gel and works best for this type of design:
This can be due to a few reasons and you have a few different options to choose from to help prevent this in future. 1. Try applying Sticky Bond to the extension free edge before applying your final sealant layer of top coat. 2. You are able to seal your chrome with a layer of Lastik or Planet Gel Polish Base Coat (curing the layer) before applying your sealant layer of top coat.
Ensure you dust to remove any loose or excess chrome thoroughly, especially under the free edge, before applying sticky bond/lastik or Top Coat.
This is an indication that it has been applied over a top coat or gel colour that cures with a tacky layer or that the no-wipe top coat chosen hasn’t been cured for long enough. If you don’t remove the excess chrome thoroughly before applying your sealant layer of top coat it can also cause a glittery appearance. Mirror finishes can only be achieved when a no-wipe top coat is used. When performing chromes on the thumbs we recommend curing them separate and FLAT to ensure a good transfer.
Not all no-wipe top coats can be used. We recommend to use LUXE GLOSS for the perfect chrome application everytime. If you’re finding that your powder doesn’t stick to your chosen top coat- 1. try wiping the top coat with alcohol after curing, wait for the nail to dry and try burnishing the chrome again; 2. Try curing the no-wipe top coat for a shorter period of time like 30sec instead of 60sec before burnishing the chrome.
Always ensure you are applying the Foil Gel as thinly as possible. If foil gel is applied too thick it can lead to chipping and peeling, it may also cause a heat spike if applied too thick.
If you struggle with peeling, Sticky Bond can be used on the free edge and sides of the free edge before your Top Coat to prevent peeling.
Your Jelly Stamper may not be prepped for Stamping Gel. If you are using both Stamping Gel and Stamping Polish we would recommend to have 2 Jelly stampers, one dedicated for each medium as the prep for each medium differs. Please watch the video below on how to prep your jelly stamper for Stamping Gel:
45 SV QT Gel Stamper from Planet Nails on Vimeo.
The pigments in this gel needs to rise to the surface before curing, it is recommended to allow some time after application to allow this to happen before curing:
-
 100% Secure Content
 -
 Competitive Pricing!
 -
 Order Tracking Available
 -
 3 - 6 days for delivery